
Better Hardware Provisioning for ML Experiments
We demonstrate how to use Terraform to provision cloud hardware for running ML experiments with Vertex AI Workbench.


In this article, highlight the pain points of provisioning hardware manually (especially for ML experiments), discuss how they originate, and how we can address these issues by provisioning hardware with code.
We’ll cover this using Vertex AI Workbench instances and Terraform. After going through the article, you’ll have the skills and knowledge to inspect your ML hardware provisioning workflows and find opportunities to improve them with code.
Introduction
Machine Learning (ML) requires extensive experimentation. Modern cloud service platforms such as Google Cloud Platform (GCP) provide feature-rich GUIs that enable ML practitioners to quickly spin-up hardware instances with everything set up – Python libraries, system-level packages, CUDA drivers, and so on.
A typical workflow here involves a few clicks on a GUI where you configure your instance, and you’re set! The entire process is quite fast, enabling you to get started quickly.
But what if there are certain requirements that your team needs to meet?
- Custom dependencies not covered by the pre-built container images provided by the cloud platform.
- Set up Python environments for running your experiments.
- Attach a startup script that monitors the CPU utilization of your instance and automatically shuts it down if the utilization is low.
- Accompany the instance with a Google Cloud Storage (GCS) bucket.
It can quickly become painful if you need to go over the above steps every time you spin up a notebook via the GUI.
It’s easy to miss a step when manually setting up a notebook instance via the GUI even with documented instructions. It can be even more complicated if the instructions themselves are not self-sufficient.
Wouldn’t it be more effective if you could use a single command to provision your hardware per your configurations? This is where a programmatic approach for provisioning hardware can be powerful — encouraging version control, reproducibility, and transparency within your team and beyond.
To learn more, read on.
The typical hardware provisioning workflow
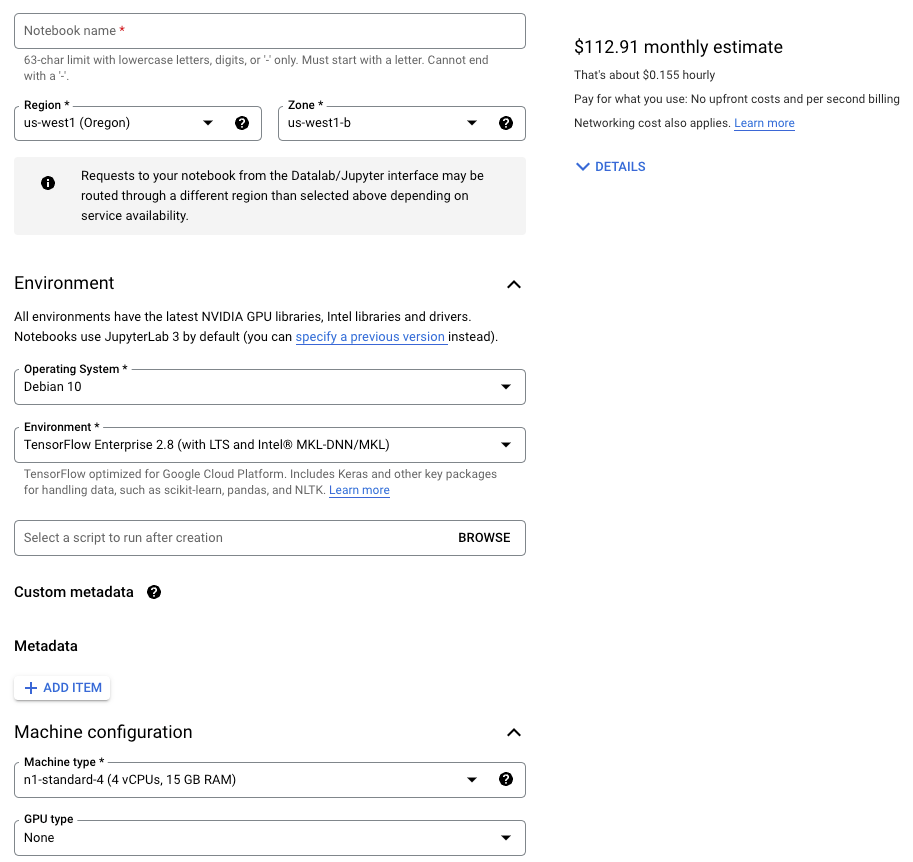
To run experiments that need to go beyond your local machine, you’d typically start by spinning up a notebook instance. You'll likely use Vertex AI Workbenches if you’re on GCP, and it provides various options to customize your notebook instance to your specification:
- Base machine type
- Base machine image (Docker) to mount
- GPU type and its count
- Boot and data disk sizes
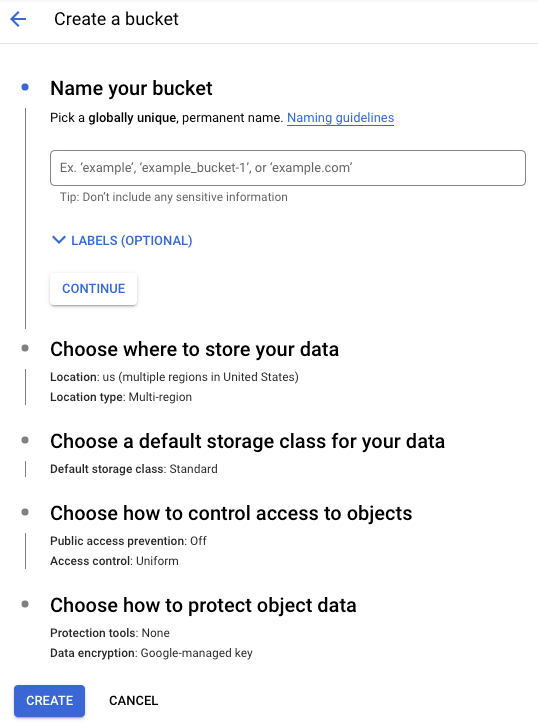
Next, you’d optionally create a Google Cloud Storage bucket to store the artifacts produced during the experimentation process. This can also be done using a few clicks from the GUI:
If everything went well, you should be ready to start running the experiments. While this workflow appears straightforward, it comes with several hidden debts. Let’s discuss them now.
Problems with the typical workflow
It's a manual, fallible process:
- Busy-work is created from repeating the same steps every time a new instance is created.
- Configuration drift and errors that stem from human error.
Manual efforts, in this case, are error-prone. The more steps and resources involved in your hardware provisioning workflow, the harder it becomes to keep track of them.
Moreover, missing a step is trivial if the process is manual, and it also has a direct effect on resource clean-up. Every time a resource is provisioned for experimentation, it must be manually cleaned up after its usage is complete.
Terraform summarizes this aptly:
“Provisioning infrastructure through point-and-click GUI’s or custom scripts is slow, error-prone, inefficient, and doesn't scale.”
Next, we’ll discuss how we can leverage Terraform to provision infrastructure with code and the advantages of moving away from a manual process.
Enter Terraform
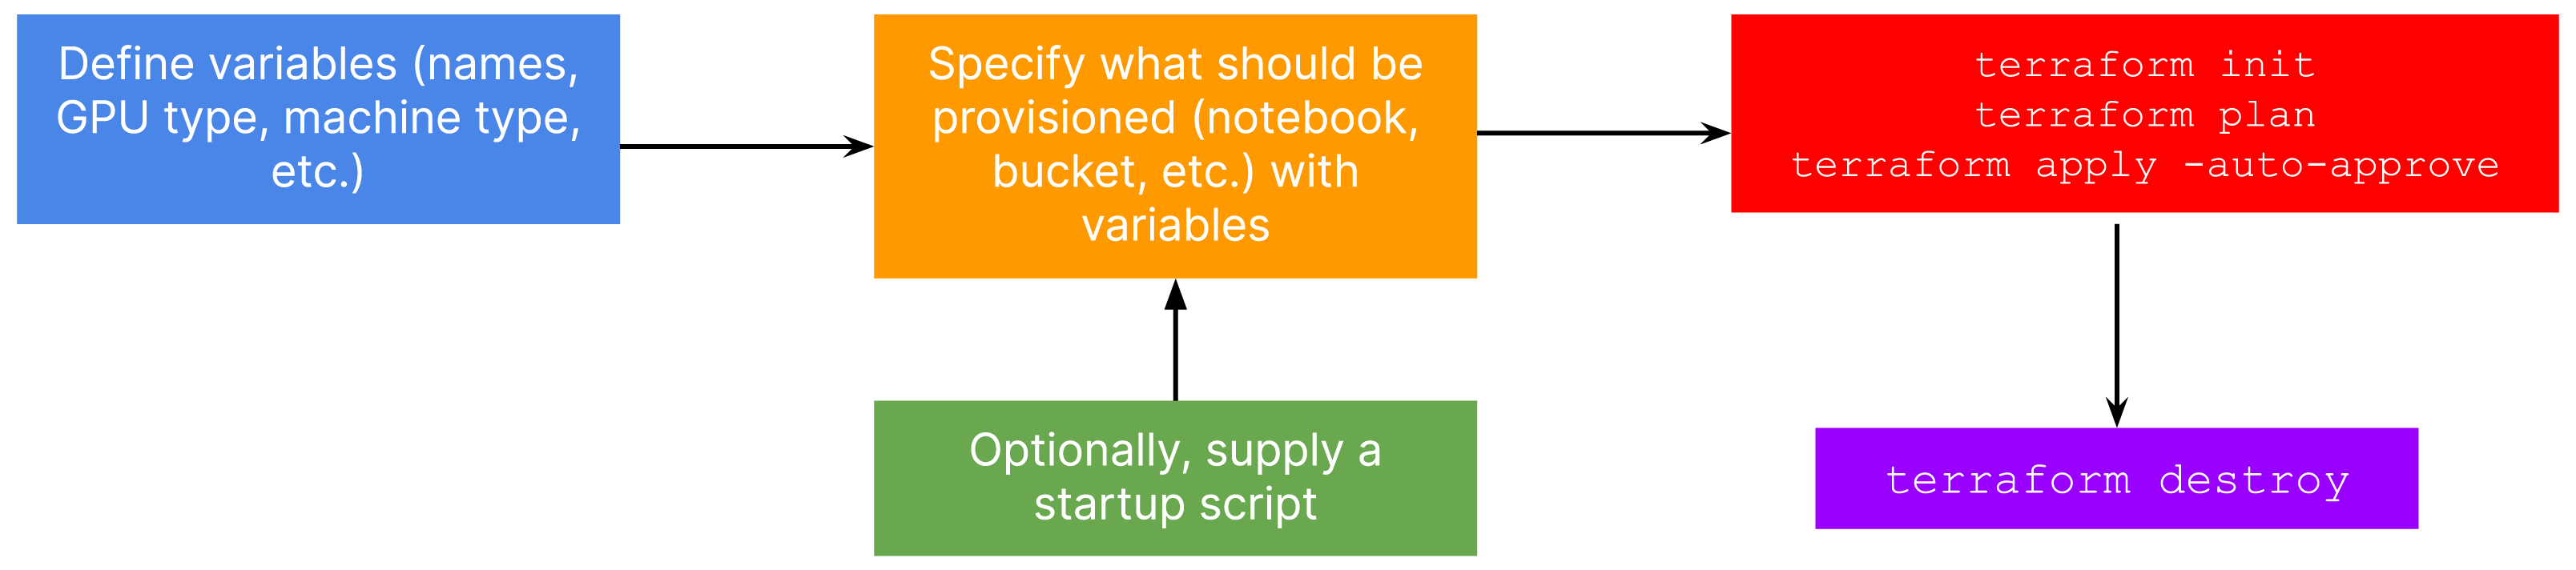
We can realize the same workflow but with code this time. Figure 3 provides a schematic of the workflow:
In case you need a refresher on Terraform, you can check out this video from freeCodeCamp.
The standard anatomy for Terraform code in our context contains a few files:
variables.tfwhere we define variables like notebook instance name, base machine type, type and number of GPUs, base Docker image, and so on.main.tfwhere we specify what resources are to be provisioned withvariables.tf.scripts/startup_script.shwhere we define anything additional that needs to be executed every time the instance is booted. This could be monitoring CPU utilization, checking for a custom system dependency, and so on.
Note that we could just maintain a single .tf file and define everything inside of it. However, having separate, semantically-related files helps with separation of concerns and keeping the configuration maintainable. The .tf extension is for HCL (Hashicorp Configuration Language).
Let’s now discuss how we could write each of the above-mentioned files to maximize our productivity in the hardware provisioning workflow.
The code discussed in the below sections can be found in this repository.
The variables.tf file
We can divide the contents of this file into meaningful components:
- GCP related information (project ID, location, etc.)
- Notebook instance related information (instance name, base machine type, etc.)
- GCS bucket related information (bucket name, region, etc.)
For each of these components, we can create variables of the type object and define their structures. For example, we could define a variable called gcp like so:
variable "gcp" {
  type = object(
    {
      project_id = string
      location   = string
      region     = string
    }
  )
  default = {
    project_id = "my-gcp-project"
    location   = "us-central1-a"
    region     = "us-central1"
  }
}
The code here is self-explanatory. Similarly, we can define the rest of the variables:
variable "notebook" {
  type = object(
    {
      notebook_name      = string
      machine_type       = string
      gpu_type           = string
      gpu_count          = number
      image_family       = string
      install_gpu_driver = bool
      boot_disk_size     = number
      data_disk_size     = number
    }
  )
  default = {
    notebook_name      = "my-ml-nb"
    machine_type       = "n1-standard-8"
    gpu_type           = "NVIDIA_TESLA_T4"
    gpu_count          = 1
    image_family       = "common-cu113"
    install_gpu_driver = true
    boot_disk_size     = 200
    data_disk_size     = 500
  }
}
Notebook variable
variable "gcs" {
  type = object(
    {
      name          = string
      location      = string
      force_destroy = bool
    }
  )
  default = {
    name          = "ml-bucket-terraform"
    location      = "us-central1"
    force_destroy = false
  }
}
GCS bucket variable
The members for these variables (notebook and gcs) are governed by their respective resource types. We’ll revisit this in a moment. Also, note that the members we’re defining have a correspondence to options that we would previously specify in their respective GUIs.
Additionally, we need to define configurations for the network and sub-network for provisioning the notebook instance, but they are not important for this article. You can find the complete variables.tf file here.
We can now specify the resources that need to be provisioned in the main.tf file.
The main.tf file
We’ll start with the notebook instance because that’s where most of the money will be spent:
resource "google_notebooks_instance" "notebook_instance" {
  project      = var.gcp.project_id
  name         = var.notebook.notebook_name
  machine_type = var.notebook.machine_type
  location     = var.gcp.location

  network = …
  subnet  = …

  vm_image {
    project      = local.image_project
    image_family = var.notebook.image_family
  }

  accelerator_config {
    type       = var.notebook.gpu_type
    core_count = var.notebook.gpu_count
  }

  install_gpu_driver = var.notebook.install_gpu_driver
  boot_disk_size_gb  = var.notebook.boot_disk_size
  data_disk_size_gb  = var.notebook.data_disk_size

  metadata = { "startup-script" : file("startup.sh") }
}
Notebook instance Terraform resource
The configurations related to provisioning a notebook instance are all defined in the variables.tf file. Even though the configurations are fairly readable, you can find more details about them in the official documentation.
One neat thing about Terraform is its support for passing arbitrary files to an instance's metadata. This way, we can define all the logic in a separate script and simply pass that in accordingly. In this startup script, we create a Python virtual environment with Conda and monitor CPU utilization. You can find the implementation here.
The GCS bucket resource can also be specified similarly:
resource "google_storage_bucket" "default" {
  project                     = var.gcp.project_id
  name                        = var.gcs.name
  location                    = var.gcs.location
  storage_class               = "REGIONAL"
  force_destroy               = var.gcs.force_destroy
  uniform_bucket_level_access = true
}
GCS bucket Terraform resource
Some optional things that we can do:
- Pass a URI of a custom container image if the custom dependencies are easier to manage that way. Check out the official notebook resource documentation to know more.
- Store the states created by Terraform in a remote location (like a GCS bucket) so that other team members can reuse them. Refer to this resource for more details.
Tying it all together
Provided you have Terraform installed and GCP authentication out of the way, getting the hardware provisioned is just a matter of two commands:
terraform init
terraform apply -auto-approve
Optionally, before the apply step, you can run terraform plan to get an overview of the resources that are going to be provisioned. It will take some time to process, and you will notice an output like so when it is finally done:
Apply complete! Resources: 2 added, 0 changed, 0 destroyed.From here, you can proceed straight to your Vertex AI Workbench console and open the newly provisioned notebook instance. Then, after your ML experiments are done you can deprovision everything with a single command:
terraform destroy -auto-approveOnce deprovisioning is complete, you should notice the following output on your terminal:
Destroy complete! Resources: 2 destroyed.You can also verify if the provisioned notebook instance matches the Terraform configuration. For example, you may want to check if the Python virtual environment got created appropriately or if the instance can log CPU utilization. You can refer to this section if you’re interested in knowing more about verification.
On the surface, it might look like a more involved process with all the files and commands, but it helps to establish a maintainable and repeatable process. Once you have figured out the variables and the resources you need to provision, the process is reduced to just a few shell commands. This becomes especially helpful when working in large or distributed teams.
Wrapping up
In this post, we shared how we provision hardware for ML experimentation at Carted. To summarize our discussion:
Manual hardware provisioning is faulty, introducing repetitive work and rough edges. Streamlining the provisioning workflow establishes the DRY principle and helps teams to have reproducibility and reduce errors when provisioning infrastructure.
With infrastructure as code, we get:
- Version control
- Maintainability
- Reusability
We hope you and your ML teams will benefit from the approaches we shared.